Thursday, July 27, 2017

Deiss Pro Julienne & Vegetable Peeler Review

Tags
Is a spiralizer necessary? I got one to review, but truth be told I’m unconvinced. It turns out there are lots of ways to get strands and ribbons from vegetables and fruit. The most common kitchen tools, a grater and a vegetable peeler work remarkably well. I'm also a fan of the mandolin which can be used to make many more types of cuts. But if you really enjoy creating these textures and want a single gadget, the Deiss Pro Julienne & Vegetable Peeler is really a three in one. It’s great for peeling potatoes and carrots, but it’s also good for creating those slithery ribbons and shredds for salads. It also has a nifty feature on the side that allows you to remove the "eyes" from potatoes without resorting to a paring knife or use it to create a peel strip from citrus fruit. 

I’ve been using this gadget on zucchini. I use the larger ribbons with chunkier pasta and the shreds with skinny noodles. I blanch the zucchini for a minute or two with the pasta, to get rid of the rawness and cook it just enough so it blends nicely with the pasta. It helps me to lower the carbs and bulk up a pasta meal with healthy vegetables. 

It’s also good for creating ribbons of cucumber for salads. 

Another way I am using it is to make vegetable slaws. The latest one I made with raw carrots, beets and celeraic. I tosssed it with a creamy sesame dressing for a deliciously crunch salad. 

This is a small gadget, and I like that it both peels and shreds, the only negative to it is cleaning it. Because it creates such fine strands, it can be a pain to remove them all, the best bet is to use a bamboo skewer if any tiny bits get stuck in the teeth. At just under $10 I think it's a good buy especially if you are in the market for a new peeler as eventually they do become dull. 

Do you have a spiralizer? Or do you use something else? If you have any favorite recipes let me know in the comments. 

Disclaimer: I was provided with the Deiss Pro Julienne & Vegetable Peeler for review purposes. This post includes an affiliate link. I was not compensated monetarily for this or any other post. 

Tuesday, July 25, 2017

Discovering Crémant d’Alsace Rosé

Tags
When I think of the wines of the Alsace I think white wine. After all 90% of the wines produced in the Alsace are white. But there’s growing interest in one particular red wine, Pinot Noir. This is a recent development, in part due to changing climate conditions. The Alsace already has a staggering 15 different soil types and now it has a longer growing season. Limestone and clay ensure that Pinot Noir will develop the right acidity and tannins. Good Pinot Noir never happens by mistake! I recently enjoyed a wine dinner with a number of different bottles of Pinot Noir from the Alsace. They had all the characteristics I expect from Pinot Noir—notes of strawberry or raspberry, smoke, leather, sometimes spice, fresh acidity. Some were fresh and vibrant, others more complex and earthy.  But the wine I enjoyed the most? Allimant Laugner Crémant d’Alsace Rosé. It's bright with strawberry and lemon, and deliciously fizzy and can be found for under $20.

I love sparking wines and Brut Rosé in particular. Crémant is the French name for sparkling wines outside of the Champagne region. Made exactly the same way as Champagne, it's the second fermentation that gives the wine bubbles. Crémant is made from several different grapes in the Alsace, but Crémant d’Alsace Rosé is made from 100% Pinot Noir. Right now I’m drinking a lovely bottle of Crémant d’Alsace Rosé from Pierre Sparr. It spends a year aging on the lees, is lively, fresh and has a smooth finish. 

There’s something extremely special about all Brut Rosé that every sommelier knows. It’s perhaps the easiest wine in the world to pair with food. Really. It goes with just about everything from light seafood to rich barbecue. It’s my go to wine when I don’t want to do a full wine pairing with a tasting menu. I know that a bottle of Brut Rosé will handle whatever courses I’m served. Of course, I might switch to a bigger bold red for a steak course, but otherwise, I trust that Brut Rosé will work. But by all means enjoy it as an aperitif as well. It's an easy going wine that is good with or without food and the ones from the Alsace are particularly good and generally very reasonably priced. What more could you ask for? 

Disclaimer: My thanks to the Wine of the Alsace for inviting me to the dinner and Thierry Fritsch, Head Oeneologist and Educator for the Conseil Interproffesionel des Vins d’Alsace for educating me about these wines. I was not compensated monetarily for this or any other post.

Wednesday, July 19, 2017

Cherry Jamming in the Miele Kitchen

Tags
Chef Rachelle Boucher shows off our cherry jam
If you’ve been to the store or maybe the farmers market recently you might have seen cherries. The sweetness of bing cherries is both intense and fleeting. Cherries don’t last long after being picked, unlike apples or oranges. That's why I'm glad to be a part of the Canbassador program.

The past few years I’ve received a crate of fresh sweet cherries from Northwest Cherry Growers. Every year I experiment preserving something different. I’ve prepared cherry barbecue sauce, canned cherries for pie, put up bourbon cherries, made cherry vanilla shrub and even dried and frozen cherries. This year I decided to make cherry jam. It turned out to be a very special cooking experience for me because I wasn’t in my kitchen, but over at the Miele showroom in San Francisco, with my pal Chef Rachelle Boucher. She kindly invited me over to do a little cooking. To be honest, working with Miele appliances will spoil you. Here’s how it went and the key ways it differed from what I do at home: 

Step 1 - Sterlized the jars in  Miele’s super duper professional dishwasher. No messy hot water bath! 
Step 2 - Cooked the jam using a super duper Miele Induction Range. I would take induction over gas anyday. Why? The minute you turn it off, there’s no heat at all. Which means while I probably should have used a larger pot, there was no risk of it boiling over since any adjustment to the heat was instantaneous. When you turn of the heat on a gas or electric range, the grate stays hot. The smooth surface also makes moving pots around easy.
Step 3 - Sterilized more jars then processed the jam in a super duper Miele Combi-Steam Oven. Again, no messy and potentially dangerous hot water bath! Because the oven uses steam, you don’t need a large capacity, and it heats instantly, no “preheating.” What else can you do in it? Well steam obviously but also roast, make yogurt, proof dough, bake bread with perfect crusts. 

You really don’t know what appliances are like until you use them. You can read all the reviews you want, but nothing takes the place of actually trying before you buy. The touchscreens, the smooth surfaces and the incredible number of settings all make this line of appliances positively dreamy. So you don’t think I turned into the perfect cook, I will now share with you the things I did wrong.  These are the three mistakes I made that I will not make again:

1. I mostly mashed the cherries instead of chopping them thoroughly. If you don’t chop the cherries finely enough, cherry jam doesn’t thicken up as much as it should. Oops! The good news is I have  syrupy cherry topping which is fabulous on Greek yogurt or ice cream and not bad on toast. I may also use some to make cherry soda or cherry cocktails, so not a complete disaster. 

2. The recipe I found online called for a teaspoon of almond extract to 4 cups of cherries. This is way too much. Better to use about a quarter or half that amount. Live and learn! Seriously though, make sure you’re confident in your recipe source. I recommend using the recipes at Sweet Preservation on the Northwest Cherries site.  

3. I doubled my recipe. While preserving is great for large quantities, when trying a new recipe, it’s best to do a small or single batch in case something goes wrong (see #1 and #2).

Disclaimer: My thanks for Northwest Stone Fruit for providing me with the cherries and to Rachelle Boucher for inviting me to cook in the Miele kitchen. I was not compensated monetarily for this or any another post on Cooking with Amy. 

Sunday, July 9, 2017

Vegan Chocolate Chunk PB Blondies

Last week I made these healthy vegan blondies (similar to brownies minus the chocolate so they are blonde haha) with chocolate chunks and peanut butter. They were delicious and did not last long in our house! My toddler twins have not had chocolate much so far in their lives and they absolutely loved the chocolate chunks on top but it was a little messy! I avoided melted chocolate finger prints on our white walls but just! 

I have popped the recipe below. I hope you enjoy it and leave a comment or tag me on Instagram if you make it/ have questions. 


Chocolate Chunks PB Blondies 
Makes 12 squares

1 can of chickpeas 
1 cup of nut milk/ soy milk
2 tsp of vanilla extract 
1/2 tsp of baking powder
1/2 cup of coconut sugar
1/4 tsp of salt
1/3 cup of peanut butter
1/3 cup of dark dairy-free chocolate broken into chunks. 
1 cup of flour of your choice- I used wholemeal. 

1. Preheat your oven to 180 degrees Celsius and line a square brownie pan with baking paper,
2. In a food processor mix the chickpeas (drained and rinsed) then add the other ingredients. Add more milk if needed.
3. Pour in your brownie pan, top with the chocolate chunks or chips and cook for 20-25 minute.
4. Leave to cool for 30 minutes and cut into 12 squares. 
5. Best kept in the fridge for up to 3-4 days.


Friday, July 7, 2017

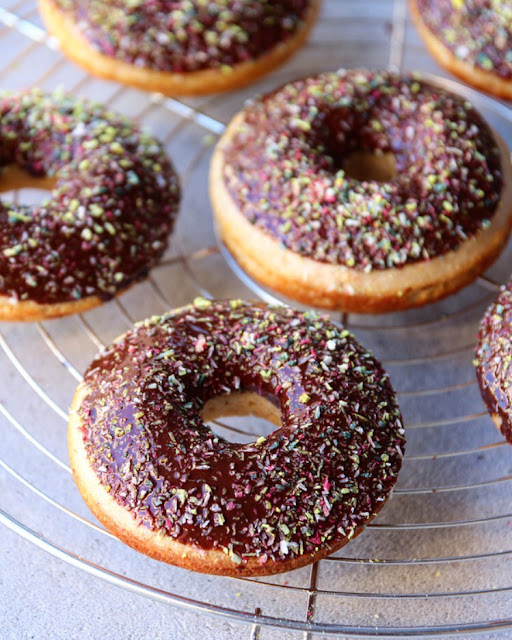
Vegan Baked Chocolate Glazed Sprinkle Donuts

Tags
Happy Saturday! I have the perfect recipe for you to make this weekend! I promise you won't regret it!

These healthy donuts are my absolute favourites! I have made them 3 times already and they were a bit hit with my hubby and twins! So go and make them!

Plus this recipe is super simple and uses very simple ingredients. You can swap the coconut sugar for normal sugar to make it even more simple!

Still healthier than normal donuts are these are baked not fried and low in fat and lower in sugar! win win!


🍩Vegan Chocolate Glazed Sprinkle Donuts 🍩
Makes 6
donuts:
1 cup of wholemeal flour
1/2 cup of coconut sugar
1/2 cup + 2 tbsp of soy milk or nut milk
1 tsp of baking powder
1 tsp apple cider vinegar

Glaze:
1/2 block of vegan dark chocolate melted
1 tsp of coconut oil
Sprinkles ( I used healthy coconut sprinkles - recipe in my Healthy Little Tummies)

1. Preheat your oven to 175 degrees Celsius
2. Grease your donut pan with spray
3. In a mixing bowl mix the soy milk apple cider vinegar and baking powder
4. Then add the flour and sugar.
5. Mix and pour in your donut pan and cook for 15-20 minutes at 175 degrees.
6. Leave to cool for a few minutes.
7. For the glaze melt the chocolate and coconut oil and dip the donuts in the glaze.
8. Place on a rack and add sugar sprinkles or coconut superfood "sprinkles"
🍩🍩🍩


Thursday, July 6, 2017

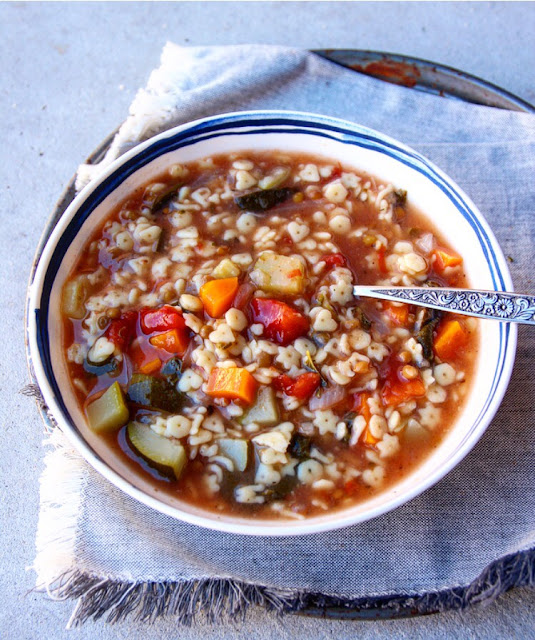
Vegan Alphabet Pasta & Lentil Soup

Tags
Hi everyone!

I made this healthy vegan soup the other night when the twins and I were fighting a cold. I remember eating alphabet or star shaped pasta as a little girl growing up when I was sick. And tomato and alphabet pasta soup by my grand-ma was my favourite soup!

I hope your little ones will enjoy it. James preferred eating the pasta and tried to remove most of the vegetables but he was sick so hopefully next time he will eat some of the zucchini and carrots too or I am thinking of cutting them even smaller so they can't pick them out haha life with toddlers!


Alphabet Pasta & Lentil Soup:

  • 1/3 diced onion (my twins are not huge fans of onions but you could add more)
  • 1 clove of garlic crushed
  • 2 zucchinis diced small
  • 2 carrots diced small
  • 1 can of diced tomatoes
  • 1 can of cooked lentils
  • 6 cups of vegetable stock
  • 1 tsp of italian dried herbs
  • 1 cup of alphabet/kids pasta
  • 1 cup of baby spinach


  1. Dice all the vegetables and cook for 1 few minutes with the onion and garlic in a large pot in a little bit of olive oil,
  2. Add in the vegetable stock and diced tomatoes and boil then reduce to medium heat,
  3. Add in the pasta and lentils (drained and rinsed) and cook until the pasta are cooked.
  4. Reduce the heat to a simmer and add in the spinach at the end. 
  5. Season to taste. Serve with crusty bread.